How to Use the WPS Button on Your Router for Easy Wi-Fi Connection
Key Takeaways
- WPS (Wi-Fi Protected Setup) simplifies connecting compatible devices to a wireless network, eliminating the need for password entry.
- The WPS connection process involves pressing the router’s WPS button, activating WPS on the device, and verifying the successful connection.
- Security risks associated with WPS, particularly the WPS PIN method, advise users to disable WPS when not in use to enhance network security.
What is the WPS Button?
Wi-Fi Protected Setup (WPS) is a function found on routers that aims to streamline the process of establishing connections with secure Wi-Fi networks, eliminating the necessity for manual password entry. Cisco introduced this feature in 2006 to aid individuals who may not have extensive technical expertise in easily incorporating devices into their Wi-Fi networks.
By pressing the WPS button located on the router, users are able to swiftly connect their compatible devices without having to navigate through complex passwords.
The primary benefit of utilizing WPS lies in its ability to bypass the need for remembering and typing out lengthy and intricate Wi-Fi passwords. This proves especially beneficial for homes equipped with multiple internet-enabled devices or when accommodating guests who require network access.
The integration of WPS has vastly improved user convenience by simplifying device connection processes within wireless networks, making it more accessible and enhancing overall ease-of-use.
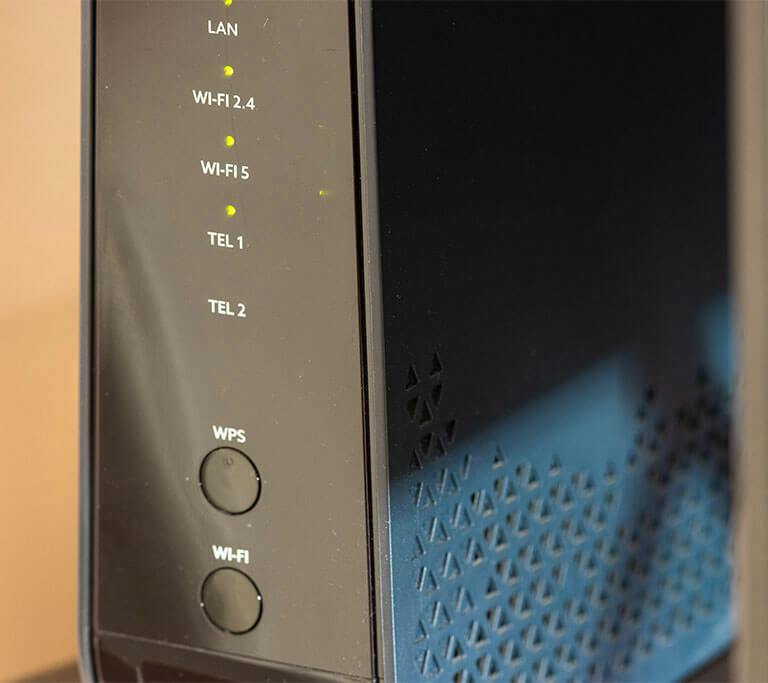
How Does the WPS Button Work?
Activating the WPS button on your router commences a seamless connection sequence, enabling devices that support Wi-Fi Protected Setup (WPS) to join the Wi-Fi network without requiring manual password input. The router thus begins scouring for any device in WPS mode to establish an automatic link, easing the addition of new apparatuses onto the network.
When you engage with the WPS feature by pressing its designated button on your router, expect its indicator light to start blinking amber or orange. This is an indication that it’s searching for compatible devices within proximity over a span of two minutes — a critical window during which you need to enable WPS on your device as well in order for them both to synchronize effectively.
After successfully connecting using this method, subsequent access by the connected gadget does not necessitate re-entry of passwords — this eliminates complications and expedites future interactions between previously paired devices and your network.
Where to Find the WPS Button on Your Router
The initial step in utilizing the convenient WPS feature is to locate the WPS button on your router. This button is typically located either at the front or back panel of your router and might be clearly marked as ‘WPS’. Alternatively, some routers may represent the WPS function with a unique icon resembling two arrows encircling each other.
Despite most routers coming equipped with a physical WPS button, there are exceptions, such as certain Apple models that do not possess this capability. Nevertheless, for these instances you can often activate WPS functionality via the web interface provided by the router if it supports such an option.
Should you find yourself uncertain about where to find the WPS button on your device, consulting the manual that accompanied your router or visiting the website of its manufacturer should provide you with clear instructions.
Steps to Connect Devices Using the WPS Button
Utilizing the WPS button to link your devices is a simple procedure, encompassing three primary steps: initiating the WPS function by pressing its button on the router, enabling WPS mode on your device, and confirming that the connection has been established.
Each phase guarantees an effortless integration of your device with your Wi-Fi network, eliminating the need for manual password entry.
Step 1: Press the WPS Button on the Router
Initiate the connection process by pressing the WPS button located on your router, thereby activating its WPS mode. This enables the router to begin scouting for devices that are equipped and ready to establish a connection. Upon engaging this button, it starts to blink as an indicator of its active search for compatible devices, facilitating a straightforward setup designed with ease-of-use in mind even for those without technical expertise.

During this procedure, there’s no need to enter any passwords, which greatly expedites the overall time taken to connect and reduces effort from the user’s side. The function of the WPS button is essentially analogous to creating a conduit that seamlessly connects your device directly into the network without delving into intricate router configurations or entering security credentials.
Step 2: Activate WPS in the Device Settings
After setting your router to WPS mode, the following action is to enable WPS on your wireless device. A majority of contemporary devices like smartphones, tablets, and laptops are equipped with support for WPS functionality. To turn on WPS, proceed to your device’s network settings and seek out the option for WPS. Choose the method labeled “WPS (Push Button),” which will trigger a search from your device for a signal emanating from the router.
Should you encounter uncertainty about locating this feature, consult the user manual of your device for detailed guidance. Once it’s enabled, expect that it will seamlessly establish a connection with your Wi-Fi network without needing you to enter any password. This approach streamlines joining networks substantially.
Step 3: Verify the Connection
Upon enabling WPS on your Wi-Fi router as well as the device you wish to connect, it is crucial to check that the connection has been established properly. A variety of devices will show a notification or symbol to confirm they have successfully linked up with the Wi-Fi network. Certain routers are equipped with LED indicators which light up or alter their hue to denote a successful link.
Should there be any trouble establishing a connection, make sure that WPS remains active on both the device and router, and consider repositioning them closer to each other for enhanced signal quality. If complications persist after these steps, restarting your modem might often rectify issues related to connectivity.
What Devices Are Compatible With WPS?
A broad array of contemporary devices, notably those with Wi-Fi capabilities, can utilize WPS for setting up wireless network connections. The support for WPS extends to a vast majority of smartphones, tablets, and laptops. Although they might not possess an explicit WPS button, these devices facilitate the use of WPS within their network settings menu to effortlessly connect them to your home Wi-Fi.
Printers from leading manufacturers such as HP, Brother, and Canon are outfitted with built-in WPS functionality which streamlines the task of linking them with your wireless network. Nevertheless, verifying that your specific device supports WPS by reviewing its specifications is recommended before attempting a connection using this method.

Security Considerations When Using WPS
WPS, although it provides considerable ease of use, is accompanied by security issues that should not be overlooked. The method using a WPS PIN is particularly vulnerable to brute-force attacks. With the right tools, an attacker could decipher the PIN within hours and thereby jeopardize your network’s security.
To reduce such vulnerabilities, disabling WPS when it isn’t actively needed is advised. By deactivating WPS once devices are connected, you can thwart unwelcome access and bolster your network’s protection.
Given these considerations, users must weigh their need for convenience against their desire for heightened security in deciding whether to leave WPS enabled or disable it.

Disabling WPS for Enhanced Security
If you’re worried about the potential security threats linked to WPS, it’s wise to deactivate this feature. You can usually do this by accessing your router’s settings and switching off WPS within the Wireless Setup section. Because various routers have distinct procedures for turning off WPS, consult your router’s documentation for precise guidance.
Once you’ve disabled WPS, make sure to save these modifications so they take effect. Regularly updating your router firmware is beneficial as it can close security loopholes and bolster the defense of your network.
Alternatives to Using the WPS Button
For those who opt not to utilize the WPS button, or whose routers lack this feature, there are other methods available for establishing connections with a Wi-Fi network. A secure method is to manually input the SSID and password into your device, which guarantees that only individuals possessing the proper credentials can gain access to your wireless network.
Alternatively, you may use an Ethernet cable for any devices capable of wired connectivity. This approach circumvents Wi-Fi entirely and offers reliable and secure network connections.
Certain routers provide an option to activate WPS via their web-based interface. This presents yet another convenient avenue for connecting devices without relying on a physical WPS button.
Troubleshooting WPS Connection Issues
Even though WPS provides a convenient way to connect devices, you might sometimes run into issues with establishing a connection. Should the attempt at making a connection fail within approximately two minutes — the duration of the WPS session — you’ll need to initiate another try by pressing the button again. It’s important that there is minimal distance between your router and device in order to boost the likelihood of connecting successfully.
In cases where your device continues not to connect, it’s crucial to confirm that WPS has been activated on both your router and device. A helpful step often involves restarting your modem, which can frequently clear up any lingering connection difficulties.
Should these problems continue unabated, seeking support from either the manufacturer of your router or from your internet service provider might be required for additional assistance.
Frequently Asked Questions About the WPS Button
What should I do if my router doesn't have a WPS button?
If your router lacks a WPS button, you can enable WPS via the router’s web interface or manually connect by entering the network password.
Is WPS secure?
The security of WPS, especially the PIN method, is compromised due to susceptibilities to brute-force attacks.
To improve the security of your network, it is recommended that you disable WPS.
What should be done to establish a WPS connection?
To establish a WPS connection, simply press the WPS button on your router after selecting the WPS (Push Button) option on your device.
This will enable the connection process effectively.
What is Wi-Fi Protected Setup (WPS)?
Wi-Fi Protected Setup (WPS) is a feature that facilitates easy connection of devices to a Wi-Fi network by eliminating the need to manually input the network password.
It streamlines the setup process for users.
What are the four modes of adding a new device to a network using WPS?
The four modes of adding a new device to a network using WPS are the PIN method, Push button method, Near-field communication method, and USB method.
Each method provides a convenient way to connect devices securely.
Streamlining Your Wi-Fi Connection
In essence, the WPS button found on your router simplifies the process of connecting compatible devices to your Wi-Fi network by eliminating the need for manual password entry. Nevertheless, it is important to recognize and mitigate any security vulnerabilities that come with using WPS in order to safeguard your network.
Being knowledgeable about how to operate the WPS feature, spotting which devices can use it, and implementing top-notch security measures enables you to make a calculated decision about employing WPS. Keep in mind that turning off WPS when it’s not active and regularly updating your router’s software are critical actions for preserving a secure wireless network.
Ready To Give Your Wi-Fi Signal a Boost?
Ready to boost your Wi-Fi and enjoy improved connectivity, faster speeds, and seamless internet browsing? The best way to ensure you have the best wireless coverage throughout your home is to use a managed Wi-Fi solution, like EPB Smart Net Plus.
With free installation, network set up, and ongoing 24/7/365 support, you'll find that your internet experience has been forever changed for the better. Click here to learn more about EPB Smart Net Plus.


